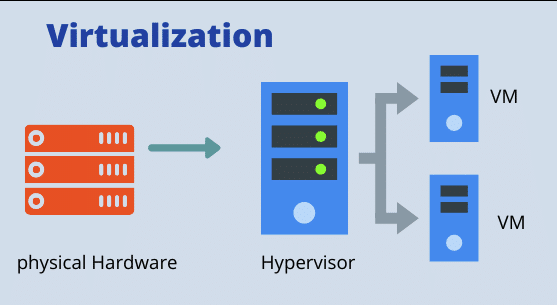
Virtualization is a technology that allows one physical computer to run multiple “virtual” computers. It’s like having multiple computers inside one physical box! This is done using a special program called a hypervisor. Virtualization has become popular because it helps businesses save money and use their computer resources more efficiently. With virtualization, businesses can easily create, delete, and move around these virtual computers as needed, making it easier to adapt to changing needs. Virtualization can also help improve security and simplify disaster recovery.
Virtualization has become increasingly popular in recent years for several reasons:
- Increased Efficiency: Virtualization allows organizations to make more efficient use of their hardware resources by consolidating multiple servers onto a single physical machine. This reduces the amount of physical hardware that is required, which can lead to significant cost savings.
- Flexibility: Virtualization makes it easy to provision and de-provision VMs as needed, which makes it easier to adapt to changing business needs. This means that organizations can quickly and easily spin up new VMs to support new applications or services, or retire VMs that are no longer needed.
- Improved Security: Virtualization can help improve security by isolating applications and services from one another, which reduces the risk of one compromised system affecting others.
- Disaster Recovery: Virtualization can help simplify disaster recovery by allowing organizations to easily replicate VMs to a secondary site or cloud-based environment. This means that in the event of a disaster, organizations can quickly spin up VMs in another location to ensure business continuity.
How to virtualize your server:
To virtualize a server, you typically need to follow these general steps:
- Choose a virtualization platform: There are several virtualization platforms available, including VMware, Hyper-V, and VirtualBox. You should choose a platform that is compatible with your server hardware and operating system. There are paid and free copies of each manufacturer if you want to try it before you buy it.
- Install the virtualization platform: Once you’ve chosen a platform, you’ll need to install it on your server. This will involve downloading the software, running the installer, and configuring the platform settings. This is done during boot-up, as the hypervisor sits between the bios (motherboard) and the operating system.
- Create virtual machines: With the virtualization platform installed, you can start creating virtual machines. This involves allocating the hardware specifications (such as CPU, memory, and storage) to each VM and installing the operating system and any required software.
- Configure the virtual machines: Once you’ve created the virtual machines, you’ll need to configure them to work with your network and any other resources they need access to.
- Migrate data and applications: If you’re virtualizing an existing physical server, you’ll need to migrate your data and applications to the virtual environment. This can be done using tools like VMware vCenter Converter, which can convert a physical machine into a virtual machine.
- Test and monitor: Once you’ve virtualized your server, it’s important to test and monitor the virtual machines to ensure that they’re working properly and to troubleshoot any issues that arise.
It’s important to note that virtualizing a server can be a complex process, and it’s recommended that you work with a qualified IT professional to ensure that the process goes smoothly and that your virtualized environment is properly configured and secure.